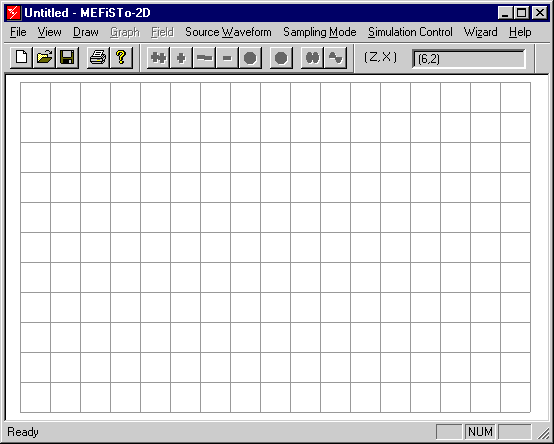
When you open MEFiSTo-2D for the first time, you see a rectangular area formed by of 17 x 11 squares. (Figure 1-1). It represents a two-dimensional grid or mesh of transmission lines, seen from above. We will discuss this grid shortly.
Figure 1-1: Startup Screen of MEFiSTo-2D showing the TLM Grid and the Main Menu.
You may think that this TLM grid is rather coarse, but it will be appropriate for your first trials of the Simulator. You will learn in Section 5.2 how to select a finer mesh. (As fine as 300 x 200 cells). The z-axis is the horizontal (left-to-right), and the x-axis the vertical (top-to-bottom) axis on the screen. The y-axis points into to the screen. (This is the convention used in many textbooks on electromagnetics).
The main menu and several toolbars appear above the grid. The main menu items each designate a pulldown menu or submenu. The Graph and Field items are disabled at startup.
The Help facility resides in the HTML Document accessible under Help. It can be modified or customized using the editor feature of your web browser.
The structure of the main menu conforms with that of other Windows applications.
| File | The File menu allows you to open, save and print documents, and to exit the program. |
| View | The View menu has three distinct
functions. The first is to alternate between the three display modes of MEFiSTo-2D (Draw, Graph and Field). Only one of these can be active at a time. The inactive items appear dimmed in the menu bar. The second is to view and edit the parameters of special elements (Varactor Diode, Active Diode and Variable Link). The third is to show or hide the various toolbars, coordinate area and Reset button. |
| Draw | The Draw menu is for drawing and editing the structure to be modeled. The TLM grid is displayed when Draw is active. |
| Graph | The Graph menu is for graphing and visualizing all input and output functions of the Simulator. |
| Field | The Field menu is for visualizing all electromagnetic field components and the dissipated power distribution in all or part of the structure. |
| Source Waveform | The Source Waveform menu lets you select the type of excitation signal you want to inject into the structure. It is your synthesizer. |
| Sampling Mode | The Sampling Mode menu lets you choose the field quantity that you want to graph or visualize. |
| Simulation Control | The Simulation Control menu lets you set the simulation parameters such as the number of time steps, the frequency window of the Fourier Transform, etc., and lets you control the simulation process. |
| Wizard | The Wizard menu contains handy
calculators for 2D model definition. The Microstrip wizard allows you to find the effective width and the effective dielectric constant of the equiva-lent parallel-plate waveguide with magnetic sidewalls (that is the model you can implement in a 2D simulation of microstrip lines and certain microstrip components). It uses quasi-static formulas to generate these values from the characteristics of the original microstrip structure. The Waveguide wizard allows you to calculate the cutoff frequencies, guided wavelengths and wave impedances of TEn0-modes in a rectangular waveguide with uniform dielectic filling. Those are the waveguide modes that can be modeled accurately in a 2D simulation. |
| Help | The Help menu features several HTML documents. The item MEFiSTo-2D is the top-level document with links to the User Guide and Operating Manual, the Tutorials, and the Virtual Electromagnetics Laboratory. The three following items of the Help menu allow you to access these documents directly. With Set Browser you can select the browser you prefer for displaying the HTML documentation. About MEFiSTo-2D contains information on the version of the MEFiSTo-2D software you are using. |
| Right Mouse Button | Clicking the right mouse button once brings up a hidden menu that repeats the principal items of the regular menus and will save you time. |
You can select or activate menu items in several ways:
| Point and Click | Place the cursor (arrow) over the item and click the left mouse button once. This standard procedure works with all items. |
| Alt + Key | If the name of the item contains an underscored letter, you can activate it from the keybord by holding down the Alt key while pressing the key carrying the underscored letter. Example: To open the File menu, hold down Alt and hit F. To activate New within the File menu, hold Alt down and hit F, then N. |
| Ctrl + Key | You can activate New, Open, Save, and Print directly by holding down the Ctrl key and hitting N, O, S, or P, respectively. |
| Toolbar Buttons | Some menu items are duplicated by buttons in the toolbars. Example: Clicking the "++" button in the Simulation Bar has the same effect as clicking on Forward in the Simulation Control menu, or pressing ALT + S + F. |
| Right Mouse Button | You can also display submenus by clicking the right
mouse button once, anywhere on the screen. A menu window appears near the cursor position.
From that menu, select any item by pointing and clicking the left or right
mouse button. Dismiss the menu window by left-clicking anywhere outside that window. The
right mouse button feature is particularly fast since you do not need to point to the top
of the screen everytime you want to open a submenu. Try all options and use whichever you prefer. |